To create a Template
1 On the ribbon, click Template Editor. The Template Editor is displayed.
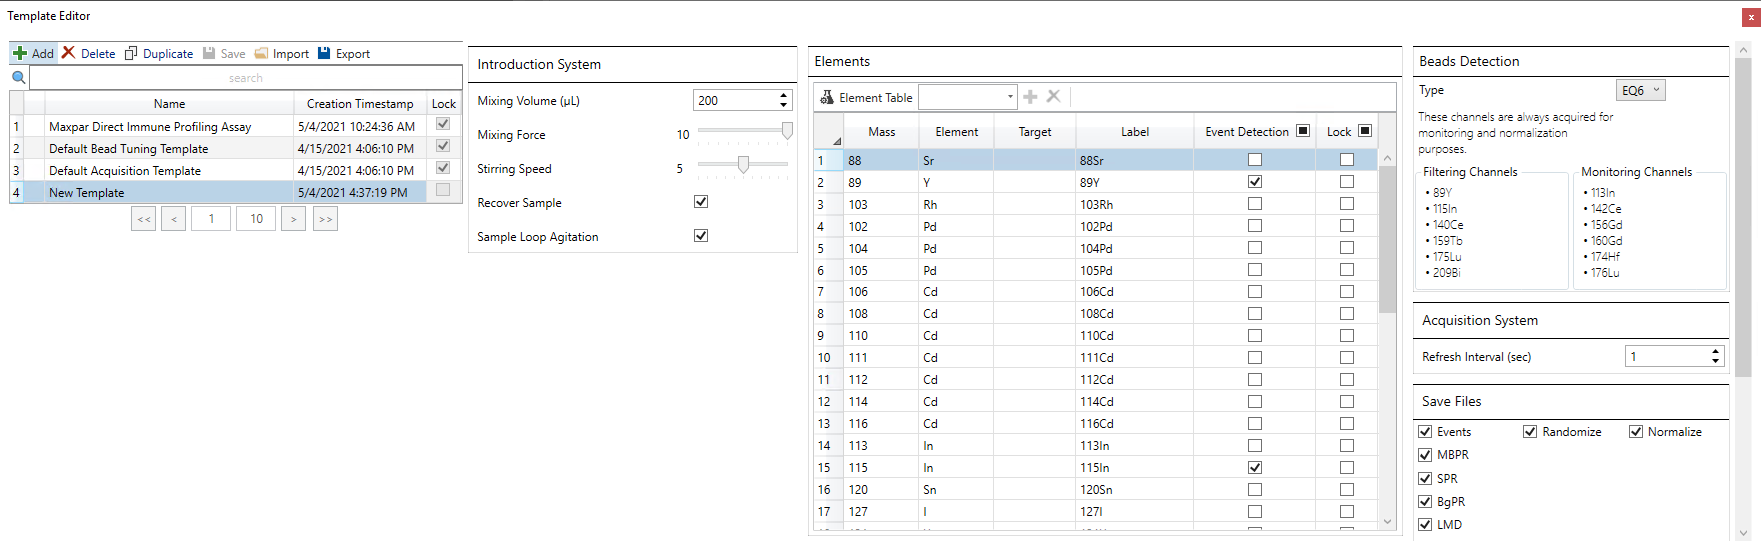
2 Click Add. A new template is added to the template list and displayed on the screen.
3 Double-click the Name column to rename the template.
4 Under Introduction System, specify the following:
IMPORTANT Reduced mixing settings may not sufficiently mix EQ Calibration Beads and may result in lower bead recovery. If you reduce the mixing settings for your sample, manually add EQ beads as an internal standard to your sample to ensure that the correct bead volume is added.
5 Under Elements, choose the channels you want to monitor in one of the following ways:
• Click Element Table, then click the elements you want to include. Click Apply.
• Choose
an element from the drop-down list and then click  .
.
6 Beads Detection is set to EQ6 by default. Use this setting for samples prepared with EQ6 beads as an internal standard (either added manually or by the Autosampler). Change Beads Detection to EQ4 for samples prepared with EQ4 beads as an internal standard or to EQ4–MDIPA for samples prepared with the Maxpar® Direct™ Immune Profiling Assay™ kit.
NOTE Bead and monitoring channels are always acquired even if they are not included in the template. The channels that are automatically acquired depend on the bead type selected.
IMPORTANT If you are creating a template for samples prepared with the Maxpar Direct Immune Profiling Assay, see Import the Maxpar Direct Immune Profiling Assay Template and Modify the Maxpar Direct Immune Profiling Assay Template.
7 Under Acquisition System, no change is required. Use the default Refresh Interval (sec).
8 Under Save Files, ensure that the following file types, selected by default in new templates, remain selected:
• Events: Generates an FCS for in-depth downstream analysis. Leave Randomize and Normalize selected to generate a single events FCS file that is randomized and normalized.
• LMD: Generates a compressed raw data file that contains ion signal for each push from all mass channels. (Replaces the IMD file format generated by earlier versions of CyTOF Software.)
Select additional files you want to
save. For more information about these files, see Choosing
File Types.
IMPORTANT
For CyTOF Users: An LMD file type must be selected in Settings Templates used for data acquisition. A notification is displayed if the Settings Template does not include an LMD file. Be sure LMD is a selected file type in the Settings Template you want to use.
For CyTOF Administrators: A warning is displayed when acquisition is started if either an LMD or events FCS file type is not included in a Settings Template used for data acquisition.
9 Under Event Detection, use the default settings for the following event detection parameters:
Parameter |
Description |
Min Event Duration (pushes) |
The minimum number of consecutive pushes with signal greater than the Static Threshold required to trigger an event. The default setting of 10 pushes is recommended for data acquisition. Reduce this setting only if event length is very short (<10 pushes).
|
Max Event Duration (pushes) |
The maximum number of consecutive pushes with signal greater than the Static Threshold to trigger event detection. For example, if Max Event Duration is 150 pushes and 151 consecutive pushes are above the Static Threshold, an event is detected but not recorded in the FCS file. The default value is recommended for use.
|
Static Threshold (Dual Counts) |
The minimum total ion count per push required for event detection. All
pushes below the static threshold are excluded from event detection. The
default setting is 12. (For Helios™ users, this is equivalent to the lower
convolution threshold value of 400 in earlier versions of CyTOF Software
for Helios.)
|
Subtract Background |
Background is the average signal from individual channels between events. When selected, the background is subtracted per channel from event-triggering pushes. Using this setting is recommended, and it is selected by default.
|
10 When you are finished, click Save.
NOTE At least one channel must be added to the Elements list to enable the Save button.
11 Click Apply to apply the template to your sample and close the Template Editor.
To modify a Template
1 In the Template Editor, click the template you want to modify. If you want to preserve the original template, click Duplicate, and then modify the copy.
2 Make the changes you want and then click Save.

 Mixing
Volume (
Mixing
Volume (